从佩带的Keras层组装网络
此示例显示如何从佩带的Keras网络导入图层,将不受支持的图层替换为自定义图层,并将图层组装到准备预测的网络中。金宝app
进口Keras网络
从KERAS网络模型导入图层。网络in.'digitsdagnetwithnoise.h5'分类数字图像。
filename =.'digitsdagnetwithnoise.h5'; lgraph = importKerasLayers(filename,'进口重量',真正);
警告:无法导入某些keras图层,因为深度学习工具箱不支持它们。金宝app他们已被占位符层所取代。要查找这些图层,请在返回的对象上调用FindPlaceHolderLayers。
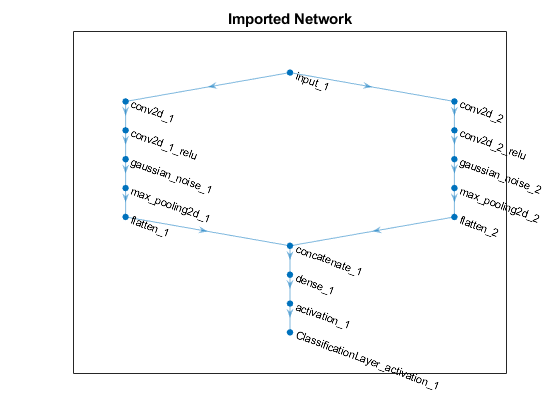
The Keras network contains some layers that are not supported by Deep Learning Toolbox. TheimportKerasLayers函数显示警告并用占位符图层替换不支持的图层。金宝app
使用图层图情节。
图绘制(3)标题("Imported Network")
更换占位符层
要替换占位符,请先识别要替换的图层的名称。查找占位符层使用findPlaceholderLayers。
PlaceHolderLayers = FindPlaceHolderLayers(Lapraph)
placeholderLayers = 2 x1 PlaceholderLayer数组智慧h layers: 1 'gaussian_noise_1' PLACEHOLDER LAYER Placeholder for 'GaussianNoise' Keras layer 2 'gaussian_noise_2' PLACEHOLDER LAYER Placeholder for 'GaussianNoise' Keras layer
显示这些图层的Keras配置。
placeholderlayers.kerasconfiguration.
ans =.结构与字段:培训:1名称:'Gaussian_Noise_1'STDDEV:1.5000
ans =.结构与字段:培训:1名称:'Gaussian_Noise_2'STDDev:0.7000
定义自定义高斯噪声层。要创建此图层,请保存文件Gaussiannoiselayer.m.in the current folder. Then, create two Gaussian noise layers with the same configurations as the imported Keras layers.
gnlayer1 =高斯登机会(1.5,'new_gaussian_noise_1');gnLayer2 = gaussianNoiseLayer(0.7,'new_gaussian_noise_2');
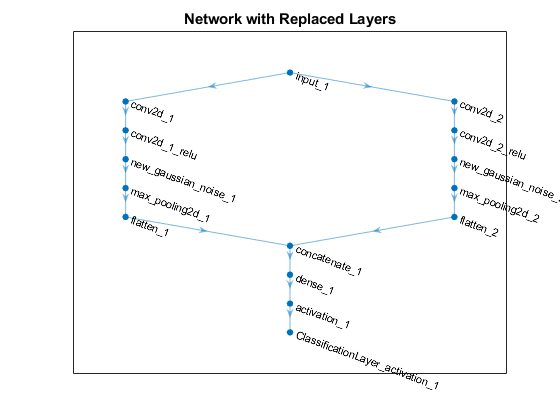
使用自定义图层替换占位符层替换剂。
Lgraph =替换剂(LGROPE,'gaussian_noise_1',gnlayer1);Lgraph =替换剂(LGROPE,'gaussian_noise_2'那gnLayer2);
使用更新的图层图情节。
图绘制(3)标题(“具有替换层的网络”)
指定类名称
如果导入的分类层不包含类,则必须在预测之前指定这些。如果未指定类,则软件会自动将类设置为1那2,......,N,在哪里N是课程的数量。
通过查看来找分类层的索引层数图层图的属性。
lapraph.Layers.
ans =.15x1 Layer array with layers: 1 'input_1' Image Input 28x28x1 images 2 'conv2d_1' Convolution 20 7x7x1 convolutions with stride [1 1] and padding 'same' 3 'conv2d_1_relu' ReLU ReLU 4 'conv2d_2' Convolution 20 3x3x1 convolutions with stride [1 1] and padding 'same' 5 'conv2d_2_relu' ReLU ReLU 6 'new_gaussian_noise_1' Gaussian Noise Gaussian noise with standard deviation 1.5 7 'new_gaussian_noise_2' Gaussian Noise Gaussian noise with standard deviation 0.7 8 'max_pooling2d_1' Max Pooling 2x2 max pooling with stride [2 2] and padding 'same' 9 'max_pooling2d_2' Max Pooling 2x2 max pooling with stride [2 2] and padding 'same' 10 'flatten_1' Keras Flatten Flatten activations into 1-D assuming C-style (row-major) order 11 'flatten_2' Keras Flatten Flatten activations into 1-D assuming C-style (row-major) order 12 'concatenate_1' Depth concatenation Depth concatenation of 2 inputs 13 'dense_1' Fully Connected 10 fully connected layer 14 'activation_1' Softmax softmax 15 'ClassificationLayer_activation_1' Classification Output crossentropyex
分类层具有名称'classificationlayer_activation_1'。View the classification layer and check the班级属性。
Clayer = Lapraph.Layers(END)
cLayer = ClassificationOutputLayer with properties: Name: 'ClassificationLayer_activation_1' Classes: 'auto' OutputSize: 'auto' Hyperparameters LossFunction: 'crossentropyex'
因为这班级property of the layer is'汽车'那you must specify the classes manually. Set the classes to0.那1,......,9.那and then replace the imported classification layer with the new one.
cLayer.Classes = string(0:9)
Clayer =具有属性的ClassificationOutputLayer:名称:'ClassificationLayer_Activation_1'类:[0 1 2 3 4 5 6 7 8 9]输出:10 HyperAmeters Interfunction:'crossentropyex'
Lgraph =替换剂(LGROPE,'classificationlayer_activation_1',粘土);
组装网络
使用层图assembleNetwork。The function returns aDagnetwork.准备用于预测的对象。
net = assemblenetwork(lgraph)
net =具有属性的dagnetwork:图层:[15x1 nnet.cnn.layer.layer]连接:[15x2表]输入名称:{'input_1'} OutputNames:{'classificationLayer_activation_1'}
也可以看看
assembleNetwork|Dagnetwork.|findPlaceholderLayers|importKerasLayers|importKerasNetwork|layerGraph|替换剂|Trainnetwork.
Related Topics
You can also select a web site from the following list:
美洲
- América Latina(Español)
- 加拿大(英语)
- 美国(英语)