主要内容
从预先训练的Keras层组装网络
这个例子展示了如何从预先训练的Keras网络导入层,用自定义层替换不支持的层,并将层组装到一个网络中准备进行预测。金宝app
进口Keras网络
从Keras网络模型导入层。网络在“digitsDAGnetwithnoise.h5”分类图像的数字。
文件名=“digitsDAGnetwithnoise.h5”;lgraph = importKerasLayers(文件名,“ImportWeights”,真正的);
警告:无法导入一些Keras层,因为它们不被深度学习工具箱支持。金宝app它们已经被占位符层所取代。要查找这些层,调用返回对象上的函数findPlaceholderLayers。
Keras网络包含深度学习工具箱不支持的一些图层。金宝app这importKeraslayers.函数显示一个警告并将不支持的层替换为占位符层。金宝app
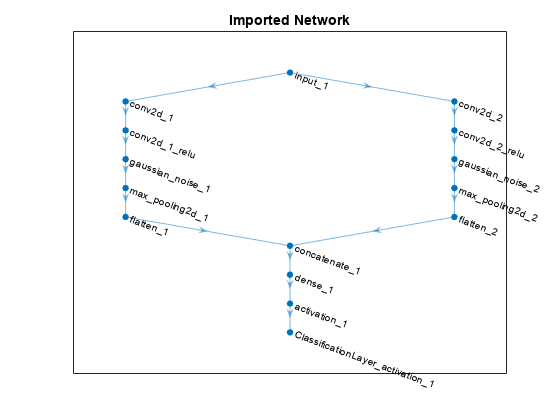
使用情节.
图绘制(lgraph)标题(“进口网络”)
替换占位符层
要替换占位符层,首先确定要替换的层的名称。使用。查找占位符层FindPlaceHolderLayers..
placeholderLayers = findPlaceholderLayers (lgraph)
PlaceHolderLayers = 2x1占位符阵列与图层:1'Gaussiannoise_1'占位符层占位符为'Gaussiannoise'keras第2层'Gaussian_Noise_2'占位符号为“高斯登单”keras层
显示这些层的Keras配置。
placeholderLayers。KerasConfiguration
ans =结构体字段:可训练:1 name: 'gaussian_noise_1' stddev: 1.5000
ans =结构体字段:可训练:1 name: 'gaussian_noise_2' stddev: 0.7000
定义一个自定义高斯噪声层。要创建这个图层,保存文件gaussianNoiseLayer.m在当前文件夹中。然后,创建具有与导入的Keras层相同的配置的高斯噪声层。
gnLayer1 = gaussianNoiseLayer (1.5,“new_gaussian_noise_1”);Gnlayer2 =高斯登机会(0.7,“new_gaussian_noise_2”);
使用自定义层替换占位符层replaceLayer.
lgraph = replaceLayer (lgraph,“gaussian_noise_1”, gnLayer1);lgraph = replaceLayer (lgraph,“gaussian_noise_2”,gnlayer2);
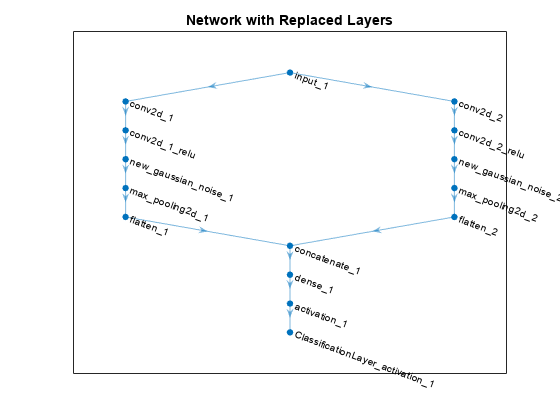
使用绘制更新的层图情节.
图绘制(lgraph)标题(“替换图层的网络”)
指定类名
如果导入的分类层不包含类,则必须在预测之前指定这些。如果未指定类,则软件会自动将类设置为1,2、……N,在那里N为类数。
的索引,查找分类层的索引层层图的性质。
lgraph。层
ANS = 15x1层阵列具有图层:1'INPUT_1'图像输入28x28x1图像2'CONV2D_1'卷积20 7x7x1卷曲与步幅[1 1]和填充'相同'3'CONV2D_1_RELU'CRECRUR 4'CONC2D_2'CRONURINGLUT20 3X3X1卷积步幅[1 1]和填充'相同'5'5'CONV2D_2_REL'CREU RELU 6'NAWSISIAN _NOISE_1'高斯噪声高斯高斯噪声具有标准偏差1.5 7'NEW_GAUSSIAN_NOISE_2'高斯噪声高斯噪声具有标准偏差0.7 8'MAX_POOLING2D_1'MAX池2D_2 MAX池步部[2]和填充'相同'9'max_pooling2d_2'最大池2x2 max池与步幅[2 2]和填充'将'10'扁平_1'keras平坦扁平激活打入1-d假设c风格(行 - 主要)order 11 'flatten_2' Keras Flatten Flatten activations into 1-D assuming C-style (row-major) order 12 'concatenate_1' Depth concatenation Depth concatenation of 2 inputs 13 'dense_1' Fully Connected 10 fully connected layer 14 'activation_1' Softmax softmax 15 'ClassificationLayer_activation_1' Classification Output crossentropyex
分类层有名称“ClassificationLayer_activation_1”.查看分类图层并检查类财产。
粘土= lgraph.Layers(结束)
clayer = scassificationOutputlayer具有属性:名称:'classificationLayer_activation_1'类:'auto'类重量:'无'输出大小:'auto'hyperparameters lockfunction:'crossentropyex'
因为类图层的属性是“汽车”,您必须手动指定类。将课程设置为0,1、……9,然后用新的将导入的分类层替换为。
clayer.classes = string(0:9)
class: [0 1 2 3 4 5 6 7 8 9] ClassWeights: 'none' OutputSize: 10 Hyperparameters LossFunction: 'crossentropyex'
lgraph = replaceLayer (lgraph,“ClassificationLayer_activation_1”、粘土);
组装网络
使用汇编.该函数返回一个DAGNetwork准备用于预测的对象。
净= assembleNetwork (lgraph)
net = DAGNetwork with properties: Layers: [15x1 net.cnn.layer. layer] Connections: [15x2 table] InputNames: {'input_1'} OutputNames: {'ClassificationLayer_activation_1'}
另请参阅
importKerasnetwork.|汇编|replaceLayer|importKeraslayers.|trainNetwork|分层图|DAGNetwork|FindPlaceHolderLayers.
相关话题
您还可以从以下列表中选择一个网站: