基于YOLO v3深度学习的目标检测代码生成
这个例子展示了如何为具有自定义层的you only look once (YOLO) v3对象检测器生成CUDA®MEX。YOLO v3在YOLO v2的基础上进行了改进,增加了多个尺度的检测,以帮助检测更小的对象。此外,将用于训练的损失函数分离为均方误差用于边界盒回归和二元交叉熵用于目标分类,有助于提高检测精度。本例中使用的YOLO v3网络是从使用YOLO v3深度学习的对象检测计算机视觉工具箱(TM)中的示例。有关更多信息,请参见使用YOLO v3深度学习的对象检测(计算机视觉工具箱).
第三方的先决条件
要求
CUDA支持NVIDIA®GPU和兼容的驱动程序。
可选
对于非mex构建,如静态、动态库或可执行程序,此示例具有以下附加要求。
NVIDIA CUDA工具包。
NVIDIA cuDNN库。
编译器和库的环境变量。有关更多信息,请参见第三方硬件而且设置必备产品下载188bet金宝搏.
验证GPU环境
要验证用于运行此示例的编译器和库是否已正确设置,请使用coder.checkGpuInstall函数。
envCfg = code . gpuenvconfig (“主机”);envCfg。DeepLibTarget =“cudnn”;envCfg。DeepCodegen = 1;envCfg。安静= 1;coder.checkGpuInstall (envCfg);
YOLO v3网络
本例中的YOLO v3网络基于squeezenet(深度学习工具箱),采用SqueezeNet中的特征提取网络,并在末端增加两个检测头。第二探测头的尺寸是第一探测头的两倍,因此能够更好地探测小物体。注意,可以根据要检测的对象的大小指定任意大小的检测头的数量。YOLO v3网络使用训练数据估计的锚盒,以获得与数据集类型相对应的更好的初始先验,并帮助网络学习准确预测锚盒。有关锚框的信息,请参见对象检测的锚框(计算机视觉工具箱).
本例中的YOLO v3网络如下图所示。
每个检测头预测边界盒坐标(x、y、宽度、高度)、对象置信度和各自锚盒掩码的类概率。因此,对于每个检测头,最后一个卷积层的输出滤波器个数为锚盒掩码个数乘以每个锚盒预测元素个数。检测头组成网络的输出层。
经过培训的YOLO v3网络
此示例使用yolov3SqueezeNetVehicleExample_21a.zip包含预先训练的YOLO v3网络的文件。这个文件的大小大约是9MB。从MathWorks网站下载该文件,然后解压缩该文件。
文件名= matlab.internal.examples.downloadSuppor金宝apptFile(“视觉/数据/”,“yolov3SqueezeNetVehicleExample_21a.zip”);解压缩(文件名);
本例中使用的YOLO v3网络使用中描述的步骤进行训练使用YOLO v3深度学习的对象检测(计算机视觉工具箱).
matFile =“yolov3SqueezeNetVehicleExample_21a.mat”;pretraining = load(matFile);Net = pretrained.net;
YOLO v3网络使用resize2dLayer(图像处理工具箱)以2的比例因子复制相邻像素值来调整2- d输入图像的大小。resize2DLayer被实现为代码生成支持的自定义层。金宝app有关更多信息,请参见为代码生成定义自定义深度学习层(深度学习工具箱).
注意:您还可以通过YOLO v3对象检测支持包的计算机视觉工具箱™模型使用预先训练的检测器网络。金宝app
要使用这个预先训练好的网络,您必须首先从Add-On Explorer中安装用于YOLO v3对象检测的计算机视觉工具箱模型。有关安装插件的更多信息,请参见获取和管理插件.
然后,从。保存网络yolov3ObjectDetector对象指向一个mat文件,然后继续。例如,
探测器= yolov3ObjectDetector(“darknet53-coco”);net =检测器.网络;matFile =“pretrainedYOLOv3Detector.mat”;保存(matFile,“净”);
的yolov3Detect入口点函数
的yolov3Detect入口点函数接受一个输入图像,并将其传递给经过训练的网络进行预测yolov3Predict函数。的yolov3Predict函数将网络对象从mat文件加载到一个持久变量中,并在后续的预测调用中重用该持久对象。具体来说,该函数使用dlnetwork(深度学习工具箱)的网络表示训练使用YOLO v3深度学习的对象检测(计算机视觉工具箱)的例子。从YOLO v3网格单元坐标得到的预测yolov3Predict然后通过使用支持函数将调用转换为边界框坐标金宝appgenerateTiledAnchors而且applyAnchorBoxOffsets.
类型(“yolov3Detect.m”)
function [bboxes,scores,labelsIndex] = yolov3Detect(matFile, im,…networkInputSize, networkOutputs, confidenceThreshold,…yolov3Detect函数检测图像中的边界框、分数和% labelsIndex。此示例将所有预处理转换应用到训练期间应用的数据集%,数据增强除外。因为示例%使用预先训练的YOLO v3网络,所以输入数据必须是原始数据的代表性%,并且不进行修改,以便进行无偏评估。具体来说,以下预处理操作应用于输入数据。% 1。将图像调整为网络输入大小,因为图像比networkInputSize大%。2.在%[0 1]范围内缩放图像像素。 3. Convert the resized and rescaled image to a dlarray object. im = dlarray(preprocessData(im, networkInputSize), "SSCB"); imageSize = size(im,[1,2]); %% Define Anchor Boxes % Specify the anchor boxes estimated on the basis of the preprocessed % training data used when training the YOLO v3 network. These anchor box % values are same as mentioned in "Object Detection Using YOLO v3 Deep % Learning" example. For details on estimating anchor boxes, see "Anchor % Boxes for Object Detection". anchors = [ 41 34; 163 130; 98 93; 144 125; 33 24; 69 66]; % Specify anchorBoxMasks to select anchor boxes to use in both the % detection heads of the YOLO v3 network. anchorBoxMasks is a cell array of % size M-by-1, where M denotes the number of detection heads. Each % detection head consists of a 1-by-N array of row index of anchors in % anchorBoxes, where N is the number of anchor boxes to use. Select anchor % boxes for each detection head based on size-use larger anchor boxes at % lower scale and smaller anchor boxes at higher scale. To do so, sort the % anchor boxes with the larger anchor boxes first and assign the first % three to the first detection head and the next three to the second % detection head. area = anchors(:, 1).*anchors(:, 2); [~, idx] = sort(area, 'descend'); anchors = anchors(idx, :); anchorBoxMasks = {[1,2,3],[4,5,6]}; %% Predict on Yolov3 % Predict and filter the detections based on confidence threshold. predictions = yolov3Predict(matFile,im,networkOutputs,anchorBoxMasks); %% Generate Detections % indices corresponding to x,y,w,h predictions for bounding boxes anchorIndex = 2:5; tiledAnchors = generateTiledAnchors(predictions,anchors,anchorBoxMasks,... anchorIndex); predictions = applyAnchorBoxOffsets(tiledAnchors, predictions,... networkInputSize, anchorIndex); [bboxes,scores,labelsIndex] = generateYOLOv3DetectionsForCodegen(predictions,... confidenceThreshold, overlapThreshold, imageSize, classes); end function YPredCell = yolov3Predict(matFile,im,networkOutputs,anchorBoxMask) % Predict the output of network and extract the confidence, x, y, % width, height, and class. % load the deep learning network for prediction persistent net; if isempty(net) net = coder.loadDeepLearningNetwork(matFile); end YPredictions = cell(coder.const(networkOutputs), 1); [YPredictions{:}] = predict(net, im); YPredCell = extractPredictions(YPredictions, anchorBoxMask); % Apply activation to the predicted cell array. YPredCell = applyActivations(YPredCell); end
评估物体检测的入口点函数
按照以下步骤评估测试数据图像上的入口点函数。
将置信度阈值指定为0.5,以便只保留置信度评分高于此值的检测。
将重叠阈值指定为0.5以去除重叠检测。
从输入数据中读取图像。
使用入口点功能
yolov3Detect以获得预测的边界框、置信度分数和类标签。用边框和置信度分数显示图像。
定义所需的阈值。
confidenceThreshold = 0.5;overlapThreshold = 0.5;
指定经过训练的网络的网络输入大小和网络输出数量。
networkInputSize = [227 227 3];networkOutputs = numel(net.OutputNames);
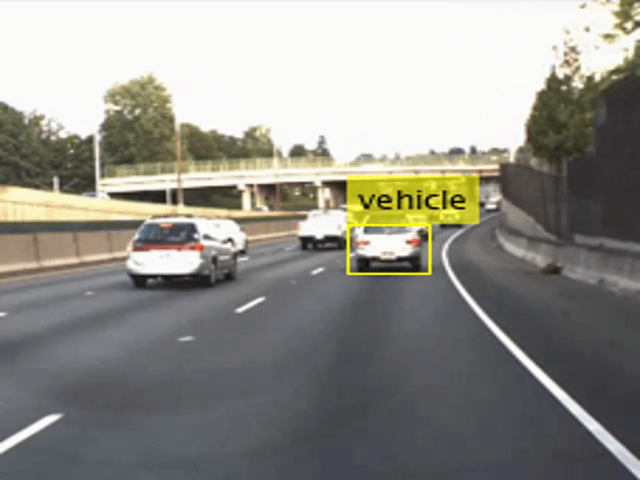
从标记的数据集中读取得到的示例图像数据使用YOLO v3深度学习的对象检测(计算机视觉工具箱)的例子。此映像包含vehicle类型对象的一个实例。
I = imread(“vehicleImage.jpg”);
指定类名。
classNames = {“汽车”};
在YOLO v3网络上调用检测方法并显示结果。
[bboxes,scores,labelsIndex] = yolov3Detect(matFile,I,...networkInputSize、networkOutputs confidenceThreshold overlapThreshold,类名);标签= classNames(标签索引);在图像上显示检测结果IAnnotated = insertObjectAnnotation(I,“矩形”、bboxes strcat(标签,{“——”}, num2str(分数)));图imshow (IAnnotated)
生成CUDA MEX
生成CUDA®代码yolov3Detect入口点函数,为MEX目标创建一个GPU代码配置对象,并将目标语言设置为c++。使用编码器。DeepLearningConfig函数来创建一个CuDNN深度学习配置对象,并将其分配给DeepLearningConfig属性的图形处理器代码配置对象。
cfg = code .gpu config (墨西哥人的);cfg。TargetLang =“c++”;cfg。DeepLearningConfig =编码器。DeepLearningConfig(TargetLibrary=“cudnn”);args = {code . constant (matFile),I,code . constant (networkInputSize),...confidenceThreshold coder.Constant (networkOutputs),...overlapThreshold,一会};codegen配置cfgyolov3Detectarg游戏arg游戏报告
代码生成成功:查看报告
为了为TensorRT目标生成CUDA®代码,创建并使用TensorRT深度学习配置对象,而不是CuDNN配置对象。同样,要为MKLDNN目标生成代码,需要创建一个CPU代码配置对象,并使用MKLDNN深度学习配置对象作为它的配置对象DeepLearningConfig财产。
运行生成的MEX
使用相同的图像输入调用生成的CUDA MEX我如前所述,并显示结果。
[bboxes,scores,labelsIndex] = yolov3Detect_mex(matFile,I,...networkInputSize、networkOutputs confidenceThreshold,...overlapThreshold,类名);标签= classNames(标签索引);图;IAnnotated = insertObjectAnnotation(I,“矩形”、bboxes strcat(标签,{“——”}, num2str(分数)));imshow (IAnnotated);

效用函数
下面列出的实用函数是基于使用YOLO v3深度学习的对象检测(计算机视觉工具箱)示例和修改,使实用程序函数适合代码生成。
类型(“applyActivations.m”)
function YPredCell = applyactivation (YPredCell) %#codegen %版权所有The MathWorks, Inc. numCells = size(YPredCell, 1);YPredCell{iCell,idx} = sigmoidActivation(YPredCell{iCell,idx});YPredCell{iCell, idx} = exp(YPredCell{iCell, idx});1:numCells YPredCell{iCell, 6} = sigmoidActivation(YPredCell{iCell, 6});end end function out = sigmoidActivation(x) out = 1./(1+exp(-x));结束
类型(“extractPredictions.m”)
The MathWorks, Inc. numPredictionHeads = size(yforecasts, 1);forecasts = cell(numPredictionHeads,6);获取所需的特征大小信息。numChannelsPred = size(yprediction {ii},3);numAnchors = size(anchorBoxMask{ii},2);numpredelemsperanchor = numChannelsPred/numAnchors;allIds = (1:numChannelsPred);stride = numpredelemsperanchor;endIdx = numChannelsPred;YPredictionsData = extractdata(yforecasts {ii}); % X positions. startIdx = 1; predictions{ii,2} = YPredictionsData(:,:,startIdx:stride:endIdx,:); xIds = startIdx:stride:endIdx; % Y positions. startIdx = 2; predictions{ii,3} = YPredictionsData(:,:,startIdx:stride:endIdx,:); yIds = startIdx:stride:endIdx; % Width. startIdx = 3; predictions{ii,4} = YPredictionsData(:,:,startIdx:stride:endIdx,:); wIds = startIdx:stride:endIdx; % Height. startIdx = 4; predictions{ii,5} = YPredictionsData(:,:,startIdx:stride:endIdx,:); hIds = startIdx:stride:endIdx; % Confidence scores. startIdx = 5; predictions{ii,1} = YPredictionsData(:,:,startIdx:stride:endIdx,:); confIds = startIdx:stride:endIdx; % Accumulate all the non-class indexes nonClassIds = [xIds yIds wIds hIds confIds]; % Class probabilities. % Get the indexes which do not belong to the nonClassIds classIdx = setdiff(allIds, nonClassIds, 'stable'); predictions{ii,6} = YPredictionsData(:,:,classIdx,:); end end
类型(“generateTiledAnchors.m”)
函数tiledAnchors = generateTiledAnchors(YPredCell,anchorBoxes,…生成平铺锚偏移,用于将预测从YOLO % v3网格单元格坐标转换为边界框坐标%#codegen %版权所有the MathWorks, Inc. numPredictionHeads = size(YPredCell,1);tiledAnchors = cell(numPredictionHeads, size(anchorIndex, 2));for i = 1:numPredictionHeads锚= anchorBoxes(anchorBoxMask{i},:);[h,w,~,n] = size(YPredCell{i,1});[tiledAnchors{2},我tiledAnchors{1}我]= ndgrid (h - 0: 0: w1,…1:尺寸(锚,1),1:n);[~, ~, tiledAnchors{我3}]= ndgrid (h - 0: 0: w1,锚(:,2),1:n);[~, ~, tiledAnchors{我4}]= ndgrid (h - 0: 0: w1,锚(:1),1:n);结束结束
类型(“applyAnchorBoxOffsets.m”)
函数YPredCell = applyAnchorBoxOffsets(tiledAnchors,YPredCell,…the MathWorks, Inc. for i = 1:size(YPredCell,1) [h,w,~,~] = size(YPredCell{i,1});YPredCell{i,anchorIndex(1)} = (tiledAnchors{i,1}+…YPredCell{我anchorIndex(1)})。/ w;YPredCell{i,anchorIndex(2)} = (tiledAnchors{i,2}+…YPredCell{我anchorIndex (2)}) / h;YPredCell{i,anchorIndex(3)} = (tiledAnchors{i,3}.*…YPredCell{我anchorIndex(3)})。/ inputImageSize (2);YPredCell{i,anchorIndex(4)} = (tiledAnchors{i,4}.*…YPredCell{我anchorIndex(4)})。/ inputImageSize (1); end end
类型(“preprocessData.m”)
调整图像的大小,并将像素缩放到0到1之间。版权所有The MathWorks, Inc. imgSize = size(图片);将单通道输入图像转换为3通道。if numel(imgSize) < 1 image = repmat(image,1,1,3);结束图像= im2single(rescale(image));image = iLetterBoxImage(image,code .const(targetSize(1:2)));函数Inew = iLetterBoxImage(I,targetSize) % LetterBoxImage通过保留输入图像I的宽高比%返回调整后的图像。'targetSize'是一个1 × 2的向量,包含目标维度的%。% % Input I可以是uint8, uint16, int16, double, single或logical,并且%必须是实的和非稀疏的。[Irow,Icol,Ichannels] = size(I); % Compute aspect Ratio. arI = Irow./Icol; % Preserve the maximum dimension based on the aspect ratio. if arI<1 IcolFin = targetSize(1,2); IrowFin = floor(IcolFin.*arI); else IrowFin = targetSize(1,1); IcolFin = floor(IrowFin./arI); end % Resize the input image. Itmp = imresize(I,[IrowFin,IcolFin]); % Initialize Inew with gray values. Inew = ones([targetSize,Ichannels],'like',I).*0.5; % Compute the offset. if arI<1 buff = targetSize(1,1)-IrowFin; else buff = targetSize(1,2)-IcolFin; end % Place the resized image on the canvas image. if (buff==0) Inew = Itmp; else buffVal = floor(buff/2); if arI<1 Inew(buffVal:buffVal+IrowFin-1,:,:) = Itmp; else Inew(:,buffVal:buffVal+IcolFin-1,:) = Itmp; end end end
参考文献
1.雷蒙,约瑟夫和阿里·法哈迪。“YOLOv3:增量改进。”预印本,2018年4月8日提交。https://arxiv.org/abs/1804.02767。
另请参阅
功能
对象
coder.gpuConfig|coder.gpuEnvConfig|编码器。TensorRTConfig|编码器。CuDNNConfig|dlarray(深度学习工具箱)|dlnetwork(深度学习工具箱)
相关的例子
- 使用YOLO v3深度学习的对象检测(计算机视觉工具箱)
更多关于
您也可以从以下列表中选择网站: